Installation
Biblo runs on Windows, macOS and Linux. Download the right installer for your system from the downloads page.
Windows
Download the installer
Get the .exe file from the downloads page. Double-click it to run the installer.
Windows SmartScreen warning
Because Biblo is not yet code-signed, Windows may show a blue "Windows protected your PC" warning. Click More info then Run anyway. This is a one-time prompt.
Launch Biblo
Biblo appears in your Start menu and on the desktop. Launch it and complete the first-launch wizard.
macOS
Download the .dmg
Open the .dmg and drag Biblo into your Applications folder.
Gatekeeper warning
Biblo isn't code-signed yet, so macOS blocks it the first time. Control-click (right-click) Biblo in Applications and choose Open, then confirm Open in the dialog — this works for most people. If that option isn't offered, go to System Settings → Privacy & Security and click Open Anyway. If macOS instead says the app "is damaged and can't be opened" (an Apple Silicon quirk with unsigned downloads), open Terminal and run:
xattr -cr /Applications/Biblo.appThen launch normally — this only needs to run once.
Launch and set up
Biblo opens. Complete the first-launch setup wizard.
Linux
Download the .AppImage, make it executable (chmod +x Biblo-*.AppImage), and run it. No installation required. On Debian/Ubuntu you can also use the .deb package.
First Launch
The first time Biblo opens, a short setup wizard walks you through the essentials.
Church profile
Enter your church name and country. This is optional but helps Abound Media understand which regions Biblo is serving. You can skip sharing this data.
Download KJV
Biblo automatically downloads the King James Version Bible — the default translation. This takes a few seconds and only happens once.
Choose voice mode
Select Online voice for the fastest, most accurate detection (requires internet during the service), or Offline voice to download a local model that runs with no connection at all.
Ready
The panel opens. You can project verses, add songs, and run a full service right away.
Interface Overview
Biblo's panel is divided into tabs on the left and a persistent live detection panel on the right.
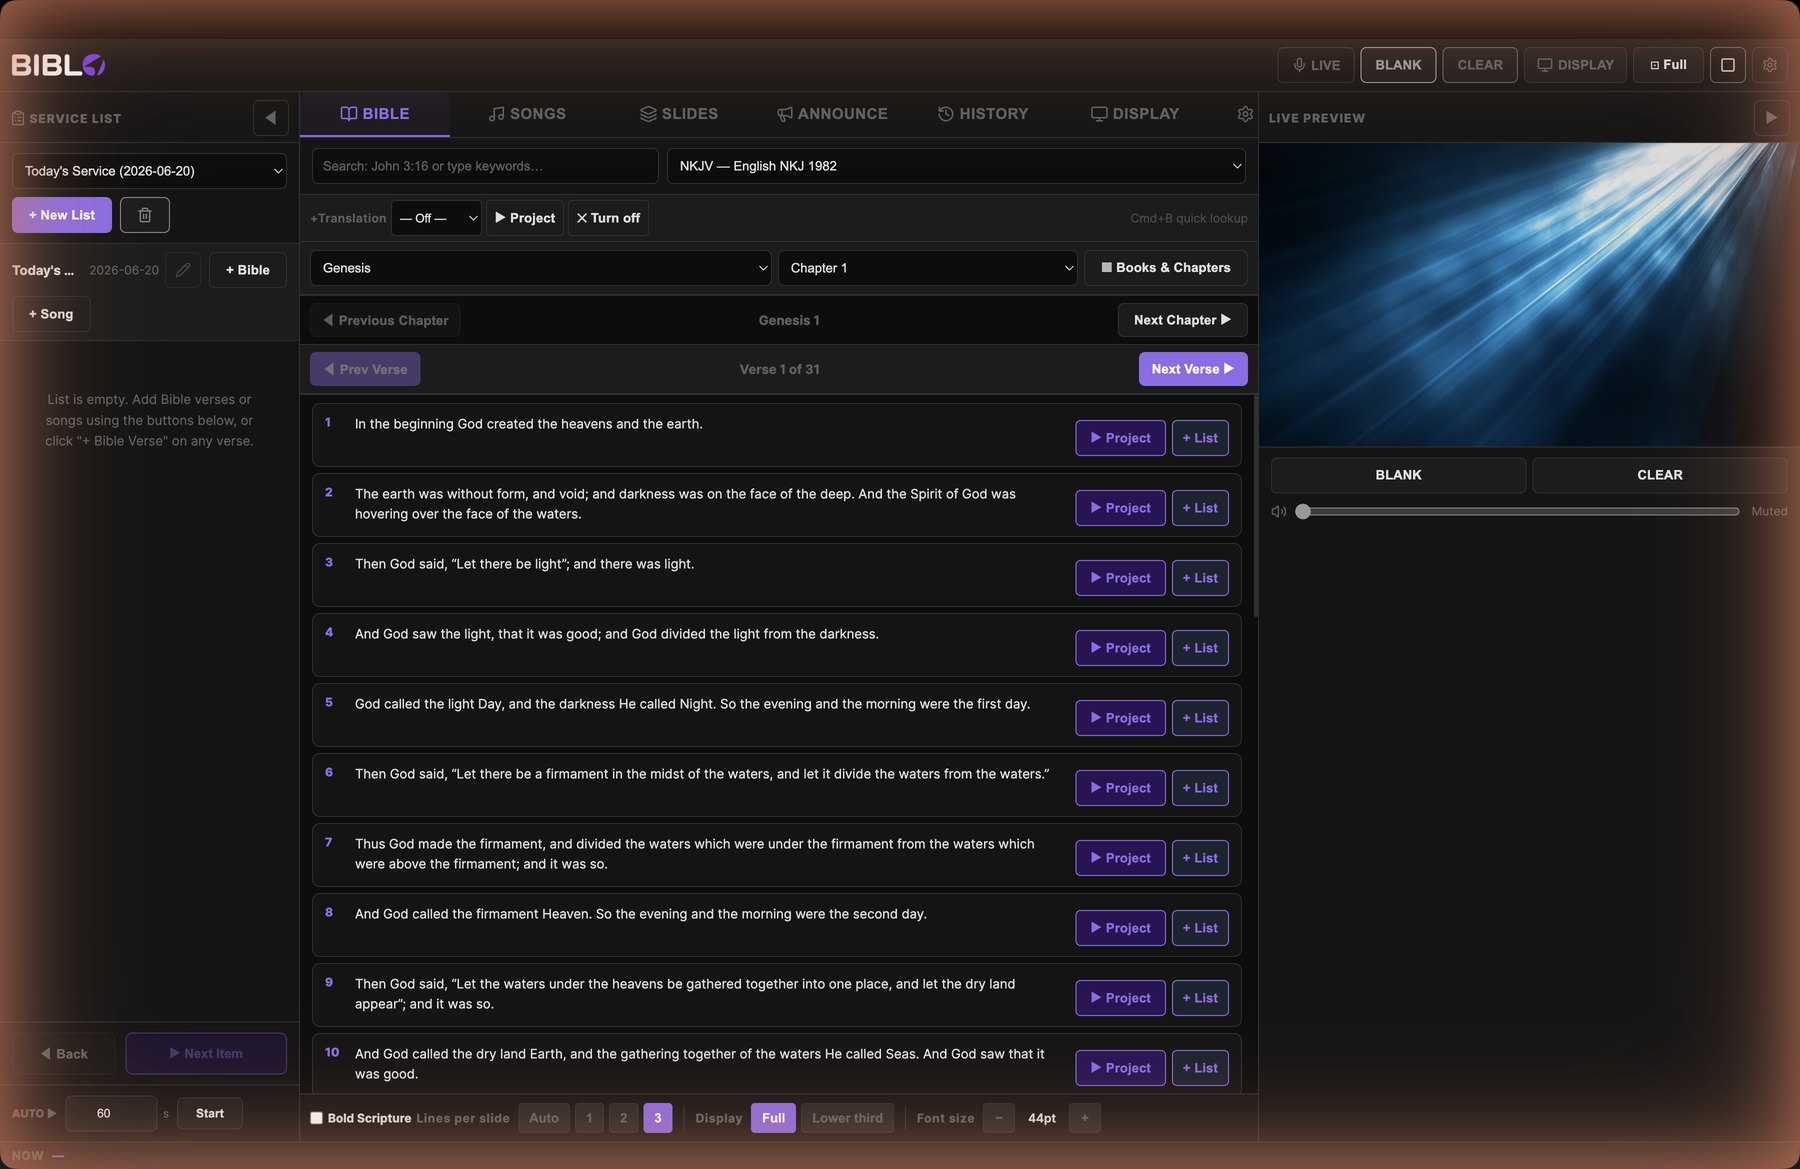
Left panel — tabs
- Bible — Browse by book and chapter, search by keyword, or type a reference to jump directly to it.
- Songs — Your lyric library. Click any section to project it.
- Slides — Text slides and countdown timers. Build and reorder them freely.
- Service List — Pre-planned order of service. Step through it during the service.
- Settings — Display styling, voice configuration, Bible downloads, OBS, and more.
Right panel — Live
The live detection panel shows the running transcript, detected scripture cards, and the BLANK / CLEAR controls. It stays visible while you work in any tab.
Projecting Verses
Find a verse and put it on the projector — in three ways.
By reference
In the Bible tab, type a reference like John 3:16 or Psalm 91 1 in the search bar. The verse appears. Click Project or press Space.
By browsing
Use the book and chapter selectors to browse. Click any verse in the list to select it, then press Space or click Project.
By live detection
Start live detection, let Biblo listen, and click Show on a detected verse card. Nothing reaches the projector without your tap — see the Live Detection section.
Controls
| Key / button | Action |
|---|---|
| ↓ / → | Next service list item |
| ↑ / ← | Previous service list item |
| Space / B | Toggle blank (black screen) |
| Escape | Clear display (transparent) |
Verse Ranges
Project multiple consecutive verses as a single slide with one tap.
In the Bible tab's Quick Lookup, type a range like John 3:16-18 or Romans 8:1-4. When the result contains more than one verse, a ▶ Project John 3:16–18 button appears above the individual verse list.
Tapping that button projects all verses together as a passage slide — each verse is numbered and displayed in sequence on the output. Individual verses remain available below the button if you only want one at a time.
Songs and Lyrics
Import lyrics, organise them by song, and project each section with one click.
Importing lyrics
- .txt files — Sections separated by a blank line. The first line of each section becomes the section label.
- OpenLyrics XML (.xml) — Exported from OpenLP, EasyWorship, FreeShow, and others.
- Find online — Search the internet for lyrics directly from the Songs tab.
Creating a song in-app
Click + New (next to Import) to open the in-app song editor. Enter the title and optional artist, then add sections using the + Add section button. Each section gets a label (Verse 1, Chorus, Bridge, etc.) and a text area for the lyrics. Save when done — the song appears in the library immediately, with no file required.
Projecting a song
Select a song in the library. The section list appears. Click any section (verse, chorus, bridge) to project it immediately. Sections too long for the display split across slides automatically with a page indicator — see Never cut off (paging).
Slides
Create text slides and countdown timers from the Slides and Announce tabs.
Creating text slides
- Open the Slides tab. A default group called "My Slides" is created automatically.
- Type your text and click + Add Text Slide. Slides are grouped and can be reordered freely.
- Click any slide to project it immediately.
Background image or colour
Go to Settings → Display → Display Theme → Background to set a background colour or image that shows behind all projected content. Choose Transparent (OBS) if you want Biblo to composite over a video feed in OBS.
Adding slides to the service list
Each slide has a + List button. Click it to add that individual slide to the Service List.
Countdown timer
In the Announce tab, select Countdown, set the minutes and an optional message, then click Project. The timer projects as a bar or full-screen overlay and counts down live.
Never Cut Off — Overflow Paging
Long content splits across slides automatically. No lyric, verse or note is ever clipped.
When a song section or a sermon note is too long to fit the display comfortably, Biblo splits it across multiple slides automatically. The split happens on natural line breaks, so phrases stay whole — the text is never cut mid-line or shrunk into unreadability.
- Page indicator — a small "2 / 3" marker shows which page of the section is on screen, so the operator always knows where they are.
- Prev / next paging — the usual next and previous controls step through the pages of the current section before moving on.
- Nothing to configure — paging applies automatically to long song sections and to sermon notes.
Service List
Build a complete order of service before Sunday and step through it during the service with one button.
Adding items
- Bible verses — Select a verse in the Bible tab and click Add to list.
- Songs — Select a song section and click Add to list.
- Slides — Click + List on any slide.
- Announcements — Text announcements and countdown timers added via the Announce tab.
Reordering
Drag any item in the list up or down to change its position. The order you see is the order Biblo will step through during the service.
During the service
Click Next (or press →) to move to the next item. Each item is projected automatically. Use the phone remote to do this from the front of the room — see Phone Remote.
Auto-advance Timer
Set a countdown on the current plan item and Biblo advances to the next one automatically when time expires.
The timer controls are in the Plan tab, below the item list. Set the duration (10–600 seconds, default 60 s) and click Start. A colour-coded progress bar appears:
- Green — plenty of time remaining
- Amber — approaching the end
- Red — final few seconds
When the timer expires, Biblo advances to the next plan item. Click Stop at any time to cancel. The timer resets when you manually advance the list.
The same countdown bar is visible in real time on the Stage Monitor — the worship team always knows how much time is left.
How Live Detection Works
Biblo listens to the preacher in real time and surfaces detected scripture before the sentence ends.
When you press LIVE, Biblo begins transcribing the audio from your selected microphone. It scans partial speech (interim results) for Bible book names and numbers. The moment it recognises a pattern like "John three sixteen" or "Psalm 91", it looks up the verse and shows a ⚡ flash card — before the preacher finishes the sentence.
Nothing appears on the projector without your tap. Click Show on any detected card to project that verse. If multiple verses are detected, use the arrow buttons to step through them.
Detection confidence
Each verse card shows a confidence percentage. Cards above ~80% are almost always correct. Cards below 50% are semantic matches — the system detected the topic of the speech rather than an explicit reference.
How Biblo picks a voice engine
Nothing to configure for most churches — Biblo tries the best free option automatically and falls back if it isn't available.
Behind the single Online/Offline switch, Biblo checks a few engines in order each time you press LIVE, and uses the first one that's ready:
- Apple native voice (macOS only) — uses the Speech recognition built into your Mac. Free, requires no download, and prefers on-device processing when your Mac supports it. This is what most Mac users are actually running with no setup at all.
- Offline voice — a local AI model you download once in Settings → Voice (Windows, Linux, and macOS as a fallback). Runs with no internet connection afterwards.
- Online voice (optional) — a cloud speech option tuned for African English accents, for churches who want it. Setup for this is being rolled out gradually and isn't visible in every build yet; Biblo automatically falls back to Offline/Standard voice until it is. There is no key bundled with the app — this step is, and will remain, entirely optional.
- Standard voice — your browser engine's built-in speech recognition (Chromium/Web Speech). Free, no setup, used automatically as a fallback when nothing else is available.
Offline Voice
Download once. Run forever. No internet required during the service.
Offline voice uses a local AI model that runs entirely on your computer. Audio never leaves your machine. The model is downloaded once from Settings → Voice → Download offline model. After download, detection works with no internet connection at all.
First download
Open Settings → Voice
Select Offline voice from the mode selector.
Download the model
Click Download offline model. The download is ~150 MB and happens once.
Use it
The model persists across app updates. You will not need to download it again.
Tips for Better Detection
A few things that make a big difference in accuracy.
Microphone placement
Use a lapel mic or a directional mic pointed at the preacher. Ambient room noise and echo are the most common reasons for missed references. The microphone selected in Settings → Voice → Input device should be the source closest to the speaker.
Reference style
Biblo recognises references spoken in these forms:
John three sixteen— word numbersJohn 3:16— when read from slides or a BibleGenesis chapter one verse one— explicit chapter/verse wordsMatthew 1 vs 1— "vs" and "v." are accepted separatorsTurn with me to Psalm 91— embedded in a sentence
Voice commands
While live detection is running, you can also speak these commands to control the display without touching the computer:
open Matthew 2 verse 5/ bare references likeJohn 3 16— open and project any verse (explicit references always project, even with Auto-project off)next verse/next slide/next scripture— advance to the verse after the one currently projectedprevious verse/prev verse/back verse/last verse— go back one verseverse 5 of that chapter/verse five of the same chapter— project verse N of the chapter already showingnext chapter/previous chapterin the Living Translation/the Amplified Bible/switch to the Message— change the Bible version by its name (must be installed)the verse that says Jacob wrestled with God— find a verse by what it says, not just by referencemake that a quote/quote that— turn the preacher's last point into an on-screen quote (online)blank— blank the display ·clear— clear the display
African accents
Online voice is tuned for West and East African pronunciation patterns, including common variations of Bible book names. If a book name is consistently missed, teach Biblo the correction (below) — it applies from then on.
Teach Biblo — self-learning corrections
Under Settings → Voice → Teach Biblo, you can teach two kinds of corrections that stay on this computer and apply every service — no internet, no cost, and they build up over time so detection gets sharper for your specific speakers:
- Fix a mis-hearing — "when it hears koran theons, read it as Corinthians". Applied to the recognised speech before matching.
- Show a verse for a phrase — "when it hears adam and eve hiding from god, show Genesis 3:8". This fires ahead of all other matching, so a phrase your congregation uses always opens the right verse.
Sermon quotes
Say make that a quote (or use the command while live) and Biblo turns the recent sermon speech into one short, quotable line and projects it. This is an online feature — it needs the online-voice key set in Settings and an internet connection.
Missed verse?
If live detection misses a verse, you can always find it manually in the Bible tab while detection continues running in the background. The two are independent.
Intelligent Sermon Notes
Biblo watches the live sermon and surfaces quotable, noteworthy lines — ready to project, or waiting for your review.
While live detection is running, Biblo also listens for lines worth keeping: strong points, memorable phrases, statements the congregation would want to see on screen. Each one appears as a note card in the live panel. Notes are filtered for duplicates and unsafe words before they're surfaced.
The NOTES toggle
The NOTES toggle in the live panel works just like the verse AUTO button:
- NOTES on — captured notes are projected automatically as they're detected.
- NOTES off — notes collect in a review queue instead. Tap any note to project it, or simply ignore the ones you don't want.
Offline by default
Note capture runs entirely offline by default — free, private, and with no internet required. An optional online refinement pass is available when you turn it on: it tidies the wording of captured notes using the online engine.
Long notes split across slides automatically with a page indicator — see Overflow paging.
Display Setup
Connect a projector or second screen and Biblo will use it as the output display.
Biblo detects connected displays and opens the output window on your second screen automatically. If it opens on the wrong screen, drag the output window to the correct display and it will remember the position.
Display window URL
The display also runs as a web page at http://localhost:5600/display. Open this in a browser on any computer on the same network to mirror the display output.
Stage Monitor
A dedicated screen for the worship team — clock, current content, what's coming next, and the auto-advance timer bar.
Open http://localhost:5600/stage (or copy the link from Settings → Remote) on any tablet, laptop, or monitor connected to the same Wi-Fi. The stage page is optimised for large text and is readable from across a platform.
What it shows
- Clock — large real-time clock, always visible
- Current content — the verse or song section currently on the projector, including reference
- UP NEXT — the next item in the active service list, updated live as the plan advances
- Auto-advance timer bar — colour countdown mirroring the panel timer (green → amber → red)
- DISPLAY BLANKED indicator — shown when the operator has blanked the screen
Operator notes
A small notes panel sits in the bottom-right corner. Click it to type, and it saves automatically to the device's local storage — your notes survive a page refresh. When idle, the panel fades to 35% opacity so it doesn't distract from the main content.
OBS Integration
Add a Biblo browser source to OBS for lower thirds on your livestream.
Find the overlay URL
Open Settings → Streaming in Biblo. Copy the overlay URL — it looks like http://localhost:5600/overlay.
Add Browser Source in OBS
In OBS, click the + button in Sources → Browser Source. Paste the URL. Set width to 1920 and height to 1080 (or match your stream resolution).
Enable transparent background
In OBS Browser Source properties, check Shutdown source when not visible and leave background colour at 0 alpha (fully transparent). The overlay will layer cleanly over your camera.
Optional: OBS WebSocket
Enable OBS WebSocket in Settings → Streaming to let Biblo control OBS scenes directly (e.g., switching to a "blank" scene when you blank the display).
Optional: run the control panel inside OBS
Add Biblo's full control panel as an OBS Custom Browser Dock (Docks → Custom Browser Docks → http://localhost:5600/panel/) and you can operate the whole service — Bible, songs, service list, projection, themes — without leaving OBS. Keep the Biblo app running in the background; the dock and the browser-source output both talk to it. Full steps are in obs-script/RUN-IN-OBS.md.
Optional: native OBS hotkeys
Biblo ships a small OBS Python script (obs-script/biblo_obs.py) that adds native OBS hotkeys for Blank, Show, and Clear. Install it once via Tools → Scripts → "+", then bind the keys in Settings → Hotkeys (search "Biblo"). Because they're real OBS hotkeys, they can be assigned to a Stream Deck. See obs-script/README.md for details.
vMix and NDI
Use Biblo's NDI output or browser source in vMix, Wirecast, or any NDI-capable software.
When NDI is enabled in Settings → Streaming, Biblo broadcasts its display window as an NDI source named Biblo Verses. Add it in vMix via Add Input → NDI / Stream. NDI requires the free NDI Tools runtime from ndi.video installed on this computer — if it's not installed, the OBS Browser Source URL above works identically with no extra software.
Alternatively, use the browser source URL in vMix's web browser input — the same URL as the OBS overlay.
Phone Remote
Control Biblo from any phone on the same Wi-Fi. No app to install.
Open Settings → Remote
A QR code is shown with the local address of the remote interface.
Scan the QR code
Point any phone camera at the code. It opens a control page in the phone's browser.
Control the service
From the phone you can: project verses, blank, clear, step through the service list, switch to a different service list, and start/stop live detection. Multiple phones can connect simultaneously.
Switching service lists from the remote
The remote page includes a dropdown listing all saved service lists. Select a list and tap Load to switch the panel to that list mid-service — useful when passing remote control to a different operator for a different part of the programme.
Bible Translations
Download additional translations inside the app. They persist across updates.
Go to Settings → Bibles. A list of available translations is shown. Click Download next to any translation. After download, switch to it using the translation selector at the top of the Bible tab.
What's one-tap downloadable
These are public-domain translations Biblo can fetch directly, no licence needed:
- English — KJV, World English Bible, American Standard Version, Young's Literal Translation, Bible in Basic English, Darby, Geneva Bible, Septuagint in English
- African languages — Swahili Union Version, Hausa Bible (2013), Igbo Bible (2020), Shona Bible (1949, Revised), Ndebele Bible (2010)
What needs your own file
NKJV, NLT, and AMP are listed in Settings → Bibles but are not auto-downloaded — they're copyrighted, so Biblo can only use a copy you already hold a licence for. Click Import Bible File and select your own XML copy in Zefania, OSIS, OpenSong, USFX, or Beblia format.
NIV and ESV aren't in the one-tap download list at all (same copyright reason), but if your church already holds a licensed copy as an XML file in one of those formats, Import Bible File will read it the same way it reads any other translation — Biblo doesn't restrict importing by translation name.
Text Styling
Customise how verse text looks on the projector and livestream.
Go to Settings → Display. Options include:
- Font size
- Text colour and background colour
- Text outline (colour and width)
- Line spacing and text alignment
- Background opacity
- Show/hide reference (e.g., "John 3:16 KJV")
Changes apply live — the display updates instantly as you adjust settings.
Backup and Restore
Export everything and restore it on a new machine in minutes.
Go to Settings → Backup. Click Export backup to save a .zip file containing all your songs, service plans, slides, and settings. Bible translations are not included (they can be re-downloaded).
To restore, open Biblo on the new machine and go to Settings → Backup → Import backup. Your library and settings are restored immediately.
App Updates
Biblo updates in-place — no uninstall required.
When a new version is available, Biblo shows a notification in the Settings tab. Click Download and install. The update downloads in the background and is applied the next time you restart the app.
On Windows, the installer runs silently in the background. On macOS, the new version replaces the old one in your Applications folder. On Linux, update the AppImage by replacing the file.
Your songs, Bibles, plans, and settings are never affected by an update.
Keyboard Shortcuts
All global shortcuts work in the main panel window.
| Shortcut | Action |
|---|---|
| ↓ / → | Next service list item |
| ↑ / ← | Previous service list item |
| Space / B | Toggle blank (black screen) |
| Escape | Clear display (transparent) |
| Cmd/Ctrl + L | Start / stop live detection |
| Cmd/Ctrl + F | Focus search bar |
| Cmd/Ctrl + B | Search for a specific word in scripture |